Tuesday, June 30, 2009

Invisible Cast On Conquered

I've been eager to start my next lace shawl, because this is the first with actual "laceweight" yarn. (Y'know that skinny stuff you can barely see?) I'm using some Fiddlesticks Zephyr Wool-Silk that I purchased back in February as a happy-birthday-to-me present. The color is "Basil," and it's one of those shades that are near impossible to capture well with a digital camera.


Deciding on a pattern took a good long while. My Ravelry queue is bursting with wonderful designs for triangular shawls, but I wanted this one to be a stole. So, of course, I had to peruse every single stole pattern in existence. (In the process, I turned up more nifty triangles too. The queue needs to go on a diet.) The final choice was the Celtic Knot Stole.


One of the delightful features of this pattern – aside from its beauty – is that it forced me to learn a new technique. I've seen the words "invisible cast on" mentioned here and there, but never understood how to do it or why one might use it. Fortunately one of the Ravelers who knit this shawl included a link to a how-to video in her comments. Blessings upon her.

Even with the video it took five or six tries to get it right. There's this little mantra you recite – "in front, behind; behind, behind." Sound familiar? The difficulty arose when attempting to get from the end of the mantra back to the beginning. But eventually I figured it out. Instead of waste yarn, I'm using a cable from my Knitpicks Harmony set so that I can attach a needle point and proceed directly to knit in the opposite direction when the time comes.


I attached some blue yarn and knit the stitches from the cable. It should be no surprise that following the directions produced the desired result. Still, there's a slight aura of magic. It works! It actually works! The directions do mention that every other stitch on the cable will be twisted, and this is true. One merely knits the twisted stitches through the back loop and all is well.


With this successful experiment behind me (kindly note that the number of stitches of each color is the same – a huge accomplishment), I cast on with the Fiddlesticks. Before proceeding any further I counted the number of stitches on the cable THREE times to verify that it was the same as the number on the needle. Yay!


This next pic is about 10 rows into the knitting. Amazing how the laceweight scrunches up to almost nothing. No problem fitting it all onto the needle.


I'm toying with the idea of knitting the first border quite soon, perhaps after I've settled into the pattern. It seems preferable to having that cable dangling off the end the whole time I'm knitting the stole.

Tuesday, June 9, 2009

My Latest Accomplishment

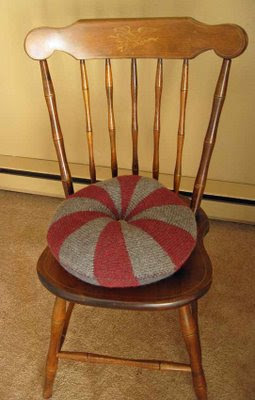
I've never made one of these before. Although there is some knitting involved, most of the work is strategizing (dare I call it designing?) and assembling. Here is the finished result, doing what it's supposed to do, i.e. protect my bony butt from the hard surface of an ancient Hitchcock chair.


The pattern, a free download from Ravelry (perhaps from elsewhere too), is called "Attractive Cushion Cover." It is NOT a modern pattern. What does this mean? It means no tutorials and minimal directions. No problem if you are already adept at short rows and have had experience casting on, binding off, and grafting an object that is short-rowed around in a circle. Fortunately the Arbacia Hat incorporates all these features, so I have already served my apprenticeship.


Knitting the little circles with leftover yarn was the easiest part. Thirty-six stitches gave the 15-inch diameter I wanted, and turning every three stitches made the pie slices a nice size. And grafting the beginning to the end Lucy-Neatby-style is super easy with this thick yarn. Also having done it once, I knew that it was best to tighten up the work as I went along. Once finished, it's nearly impossible to distinguish the grafting from the stitches.


I thought the teensy hole in the middle would look better covered, so while the pieces were blocking I strolled over to Alamitos Bay Yarn Company (Have I mentioned that I absolutely love living a short walk from a marvelous yarn store?) and procured some cute buttons. The two tones of silver on the buttons perfectly match the two shades of gray on the cushion. Button perfection has been attained.


I used a strand of each yarn to sew the pieces together, so the cranberry and gray would mix and have that "I meant to do it" look. I think this is called Whipstitch, but I couldn't swear to it. My hands often remember how to do things that my brain has long since forgotten.

I finished most of the sewing and then began stuffing, only to discover that the cushion did not look quite right (no pic of this phase). I had fastened each button to its appropriate side, but in order to get the depression in the middle I needed to fasten the buttons to each other. A little stuffing removal and fishing about inside to hitch up the two button shanks with a bit of yarn took care of that problem.

And so we have . . .

A dark gray side


And a light gray side


The coolest thing about this "pattern" is that you can use any weight of yarn, any number of stitches, turn on whatever number of stitches gives a wedge size you like, and use however many colors you want. Perfect for leftovers.